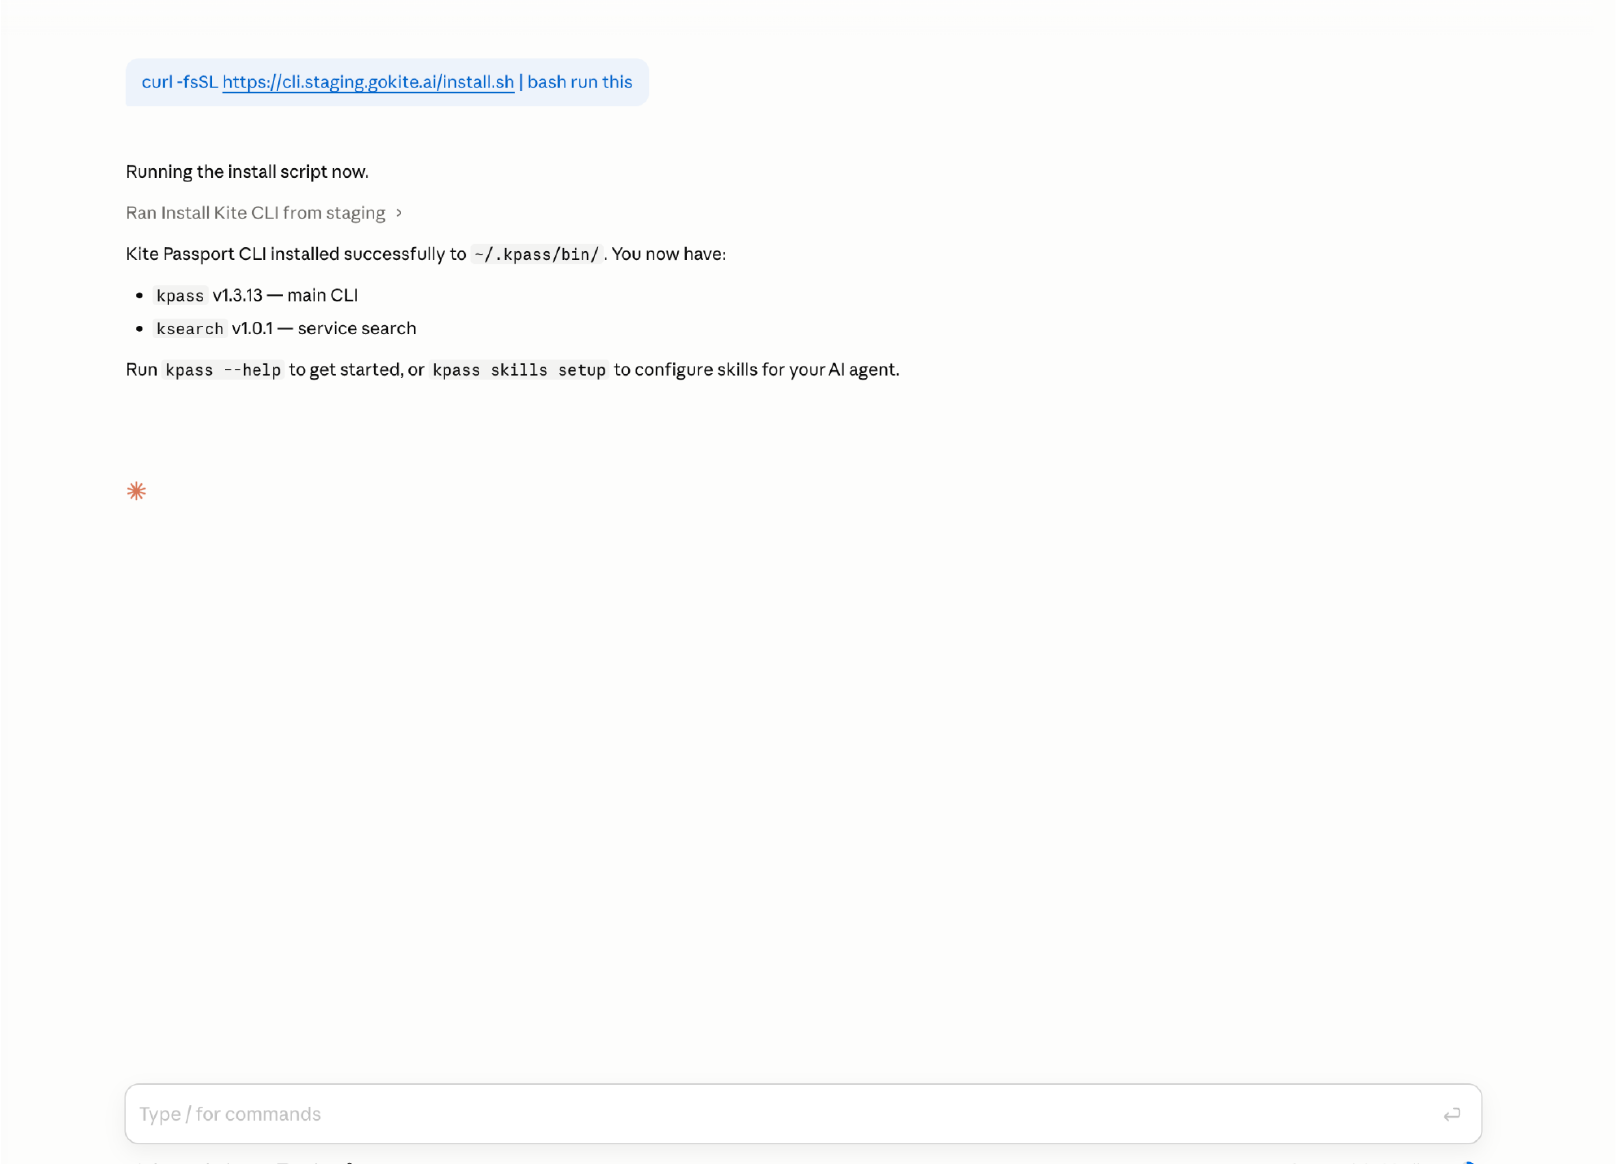
Kite Agent Passport
Quick Start Guide

From zero to your first
autonomous AI payment

Kite Passport is the payment rails for AI agents. In under 10 minutes, you'll install the CLI, fund your account, authorize a spending session, and let your agent make its first real payment.

Passkey-secured Claude Code ready OpenAI Codex ready x402 payments
First time? Start here

Run this guide through an AI coding agent

Every kpass command below is designed to be invoked by an AI agent such as Claude Code or OpenAI Codex. Not a developer? No problem: install one of those agents and just chat with it in plain English. It'll handle the commands.

Set up your Agent
install.sh
$ curl -fsSL https://agentpassport.ai/install.sh | bash
01

What is Kite Passport?

Kite Passport is a payment authorization framework for AI agents. You grant your agent a scoped spending session; the agent pays on your behalf through the Kite network; you approve every session with your passkey before a single dollar moves.

Scoped delegation

Set a per-transaction limit, a total budget, a time-to-live, and an allowed asset list. The agent can spend only within this envelope.

x402 payments

Paid APIs return HTTP 402. Passport negotiates payment, posts it on the Kite chain, and relays the 200 response back to your agent.

Human-in-the-loop

Every session request lands on an approval page. You review the delegation, confirm with passkey, and the session becomes active.

02

Set up Kite Agent Passport

Installing Passport is one command. Creating your account takes two more. Registering your agent identity takes one.

1

Install the kpass CLI

Runs on macOS, Linux, and WSL. The installer downloads the binaries to ~/.kpass/ and symlinks them into ~/.local/bin/. Open a fresh terminal afterwards so your PATH picks them up.

bash
# Install — works on macOS, Linux, and WSL
curl -fsSL https://agentpassport.ai/install.sh | bash

# Verify
kpass --version

Where's it installing?

agentpassport.ai/install.sh redirects to cli.gokite.ai/install.sh. Both are official. The script never asks for sudo — it stays inside your home directory.

2

Sign up with your email

Passport uses passwordless email. You'll receive a verification link; click it and the CLI exchanges the confirmation for a JWT stored locally in .kite-passport/config.json.

bash
$ kpass signup init --email you@example.com --output json
# → A verification link was sent to you@example.com.

$ kpass signup poll --signup-id <SIGNUP_ID> --wait --output json
# → status: verified

$ kpass signup exchange \
    --signup-id <SIGNUP_ID> \
    --exchange-token <TOKEN> \
    --output json
# → Signed up and logged in as you@example.com.
json
{
  "signup_id":      "signup_019dc4dc-5711-72b4-a8b0-9d624b3bd40c",
  "exchange_token": "",
  "expires_at":     "2026-04-25T13:52:47Z",
  "next_command":   "kpass signup poll --signup-id signup_019dc4dc-... --wait --output json",
  "status":         "human_action_required"
}

Where do <SIGNUP_ID> and <TOKEN> come from? signup_id is right here in the response above — copy it. The exchange_token is empty for now: it's filled in by kpass signup poll once you click the verification link in your email. Then signup exchange consumes both.

agent · chat
Sign me up to Kite Passport

RanStart signup with kite email

A verification link has been sent to — click it to confirm your email.

Then paste the 8-character code from the same email here.

kpass signup flow — verification email & CLI polling output
3

Register your agent identity

Each AI agent that acts on your behalf gets its own identity tied to your user account. Run this once per project; it's idempotent, so re-running is safe.

bash
$ kpass agent:register --type coding-assistant --output json
# → Agent registered. Credentials saved to .kite-passport/agent.json

Healthcheck anytime

Run kpass status --output json to see everything at a glance: backend reachability, your user identity, your agent registration, and the active session (if any).

Coming back later? Log back in.

If you've already signed up, you don't need to sign up again. Use OTP login: a one-time code is emailed to you, you paste it back.

bash
$ kpass login init --email you@example.com --output json
# → A one-time code was sent to you@example.com

$ kpass login verify --login-id <LOGIN_ID> --code <8-CHAR-CODE> --output json
# → Logged in as you@example.com
03

Fund your Passport

Your Passport has a custodial wallet on the Kite chain. To pay for anything you first need to put funds into it. Pick whichever on-ramp you prefer.

Send only on Kite chain (ID 2366)

Funds sent on Ethereum, Base, Arbitrum, Solana, or any other network — including direct withdrawals from a centralized exchange — will be lost. Only use a wallet or bridge that explicitly supports Kite chain ID 2366.

Kite's web dashboard handles card and ACH on-ramps via our partner Banxa (cryptocurrency services powered by Zero Hash). KYC is required; minimum purchase is $20 USD. Sign in with the same email you used for signup.

  1. Visit agentpassport.ai/dashboard and sign in with passkey.
  2. Open Wallet → Add Funds.
  3. Choose Card or Bank (ACH), enter the amount in USD, and confirm.
  4. Funds appear as USDC in your Passport wallet within a few minutes.

Never paste card details into the CLI

Card and ACH flows are intentionally browser-only. The CLI never asks for card numbers — if something claims it does, stop and report it.

BANXA · ON-RAMP
Spend
100
USD
Receive
99.98
USDC
Selected blockchain
KiteAI
VISA · MCVisa / Mastercard
G PAYGoogle Pay
ACHBank ACH
Total Payable$100.00 USD

Cryptocurrency services powered by Zero Hash

Banxa on-ramp — Spend USD, receive USDC on KiteAI chain

Already have USDC or KITE on another chain? Use the Kite Bridge (powered by LayerZero, ~0.0065 AVAX gas, ~1 min) to bridge in, or send directly to the address shown by kpass wallet balance.

bash
$ kpass wallet balance --output json
{
  "wallet_address": "0xabc123…",
  "chain_id": 2366,
  "assets": [
    { "symbol": "KITE", "balance": "0", "native": true },
    { "symbol": "USDC", "balance": "0" }
  ]
}

Copy the wallet_address and send USDC from any compatible wallet on chain 2366. The balance updates the moment the transfer confirms.

For development and testing, grab free test tokens. Make sure you're logged in (kpass login init) and have your Passport wallet address ready.

bash
$ kpass faucet drop \
    --recipient 0xYourWallet \
    --token USDC \
    --output json
# → Dropped 100 USDC to 0xYourWallet.

Need your wallet address?

Run kpass wallet balance --output json and copy the wallet_address field — that's what goes after --recipient.

04

Create a spending session

A session is a signed delegation from you to your agent: "you may spend up to $X per transaction, $Y total, using these assets, for the next Z hours." Nothing is deducted when the session is created — only when the agent spends.

Fig 4.1 — Session delegation & x402 flow
1

Create the session request

Tell Passport what the agent is doing and how much it's allowed to spend. A human-readable --task-summary is shown on the approval screen — make it honest.

bash
$ kpass agent:session create \
    --task-summary 'General spending session' \
    --max-amount-per-tx 2 \
    --max-total-amount 10 \
    --ttl 2h \
    --assets USDC \
    --output json
json
# What session create returns:
{
  "request_id":   "agent_session_req_019dc4dc-5895-77e2-b52a-89cd46391478",
  "approval_url": "https://app.gokite.ai/approve/agent_session_req_019dc4dc",
  "expires_at":   "2026-04-26T22:00:00Z",
  "next_command": "kpass agent:session status --request-id agent_session_req_019dc4dc... --wait --output json",
  "status":       "human_action_required"
}

What you do next: copy the approval_url, open it in a browser, and review & passkey-approve the delegation. Hold onto the request_id too — Step 3 polls it.

2

Approve the delegation with passkey

The CLI returns an approval_url. Open it in your browser, read the delegation summary, and confirm with your passkey.

Approve agent session

Review the details below granting access

Codexagent_session_req_019dc4dc-5895-77e2-b52a-89cd46391478
General spending session
Task
General spending session
Why payment needed
This session can spend up to $2 per transaction with a total budget of $10 and expires in 2 hours.
Allowed payment approaches
x402
Max per tx
$2 USDC
Max budget
$10 USDC
Session expires
2 hours
Approve agent session — delegation summary, sliders for limits, passkey confirm
3

Wait for activation

Your agent keeps polling. The moment you approve, the session becomes active and is saved as current_session_id in agent.json.

bash
$ kpass agent:session status --request-id <REQUEST_ID> --wait --output json
# → session approved, current_session_id saved.

Delegation parameters at a glance

Flag Required Meaning
--task-summaryRecommendedPlain-English description shown on the approval page.
--max-amount-per-txYesHard ceiling on any single payment.
--max-total-amountOptionalTotal budget for the entire session.
--ttlYesHow long the session stays valid. Accepts 90s, 30m, 24h, 7d.
--assetsOptionalComma-separated list of allowed tokens, e.g. USDC,KITE.
05

Start spending

With an active session, three common scenarios unlock. All of them automatically respect your delegation limits — Passport will block any payment that violates the policy and return a clear error.

A

Scenario A · Call a paid API

Passport proxies the request: when the merchant responds with 402, it pays and retries transparently. You get the real 200 body back. · Try the live sandbox: weather.hugen.tokyo returns Tokyo weather data when paid.

bash
$ kpass agent:session execute \
    --url https://weather.hugen.tokyo/?city=Tokyo \
    --method POST \
    --body '{"query":"What is the weather?"}' \
    --output json
B

Scenario B · Send tokens wallet-to-wallet

Direct transfers. Requires your user JWT but no spending session — you're moving your own funds.

bash
$ kpass wallet send \
    --to 0xRecipient --amount 10.5 --asset USDC \
    --output json
C

Scenario C · Buy real goods

Install the shopping skill and ask your agent in plain English. It searches catalogs (currently Amazon), builds a cart, collects a shipping address, and checks out with crypto — still inside your session limit.

bash
$ npx skills add kite/passport-skills/shopping
# Then, in your AI agent:
#   "Find me a 60% mechanical keyboard under $120 and check out."

Audit your spend anytime

Run kpass user sessions --status active to see every live session and its spent_total. Revoke by letting the TTL expire or creating a new session with a tighter scope.

06

Appendix — set up your AI agent

Kite Passport needs an AI agent that can execute shell commands. The two most common options:

Claude Code

Install Claude Code (docs.claude.com/claude-code) and add the Passport skills so the agent knows how to drive the CLI.

bash
# Install Claude Code if you haven't already
curl -fsSL https://claude.ai/install.sh | bash

# Add the Kite Passport skill bundle
npx skills add kite/passport-skills/authenticate-user
npx skills add kite/passport-skills/request-session
npx skills add kite/passport-skills/x402-execute
npx skills add kite/passport-skills/wallet-send
npx skills add kite/passport-skills/manage-agents
npx skills add kite/passport-skills/activity

OpenAI Codex

Codex CLI supports shell tool-use out of the box. Install it, then point it at the same kpass binary.

bash
# Install Codex CLI (login with your ChatGPT account)
npm install -g @openai/codex
# (or: brew install --cask codex on macOS)

# Then the same Passport install as above
curl -fsSL https://agentpassport.ai/install.sh | bash

# Talk to Codex in plain English:
#   "Use kpass to pay for https://weather.hugen.tokyo/?city=Tokyo
#    and summarise the result."

Exit codes cheat-sheet

Code Name What happened
0SUCCESSCompleted — or a human action is required (check status field).
1NETWORKBackend unreachable. Check kpass health.
2USAGEMissing flag / bad argument. Re-read the command.
3AUTHJWT expired, OTP wrong, or delegation violated. Re-login or adjust limits.
4NOT_FOUNDUser, session, or agent missing. Run kpass status to see what's up.
5RATE_LIMITEDSlow down and retry.

Recovery recipes

  • Session expired or budget exceeded: run kpass agent:session create … --ttl 1h --max-amount-per-tx 1 again, then kpass agent:session status --request-id <ID> --wait after passkey-approving the new approval URL.
  • JWT expired (exit 3 from any user-auth command): kpass login init --email you@example.com → check email → kpass login verify --login-id <ID> --code <CODE>.
  • Lost track of state? kpass status --output json always tells you the next exact command to run via the next_command field.
  • Signup expired before you clicked the link? Re-run kpass signup init --email you@example.com --output json to get a fresh signup_id and link.
  • Funding not yet arrived? Check kpass wallet balance --output json; for crypto, wait for chain confirmation; for card/ACH, check email for Banxa updates.
  • Got HTTP 402 mid-flow? Your wallet is short on USDC. Top up via kpass faucet drop (testnet) or §03 Card / Bridge.

Where to get help

Quick view · visual guide

Use Kite Passport with your AI agent

A screenshot-first path for installing Passport, adding funds, approving a spending session, and letting your agent pay.

01

Install and sign up

Open Claude Code, Codex, or another AI agent that can execute shell commands. Passport setup will not work from a chat-only agent.

Give your agent this exact install command and ask it to run it:

curl -fsSL https://agentpassport.ai/install.sh | bash

Then sign up. You will receive a verification link and an email code; click the link, then paste the code back into your agent chat.

Agent running the Kite Passport installer
Agent runs the Passport installer
Agent starting Kite Passport signup
Agent starts signup and asks for the email code

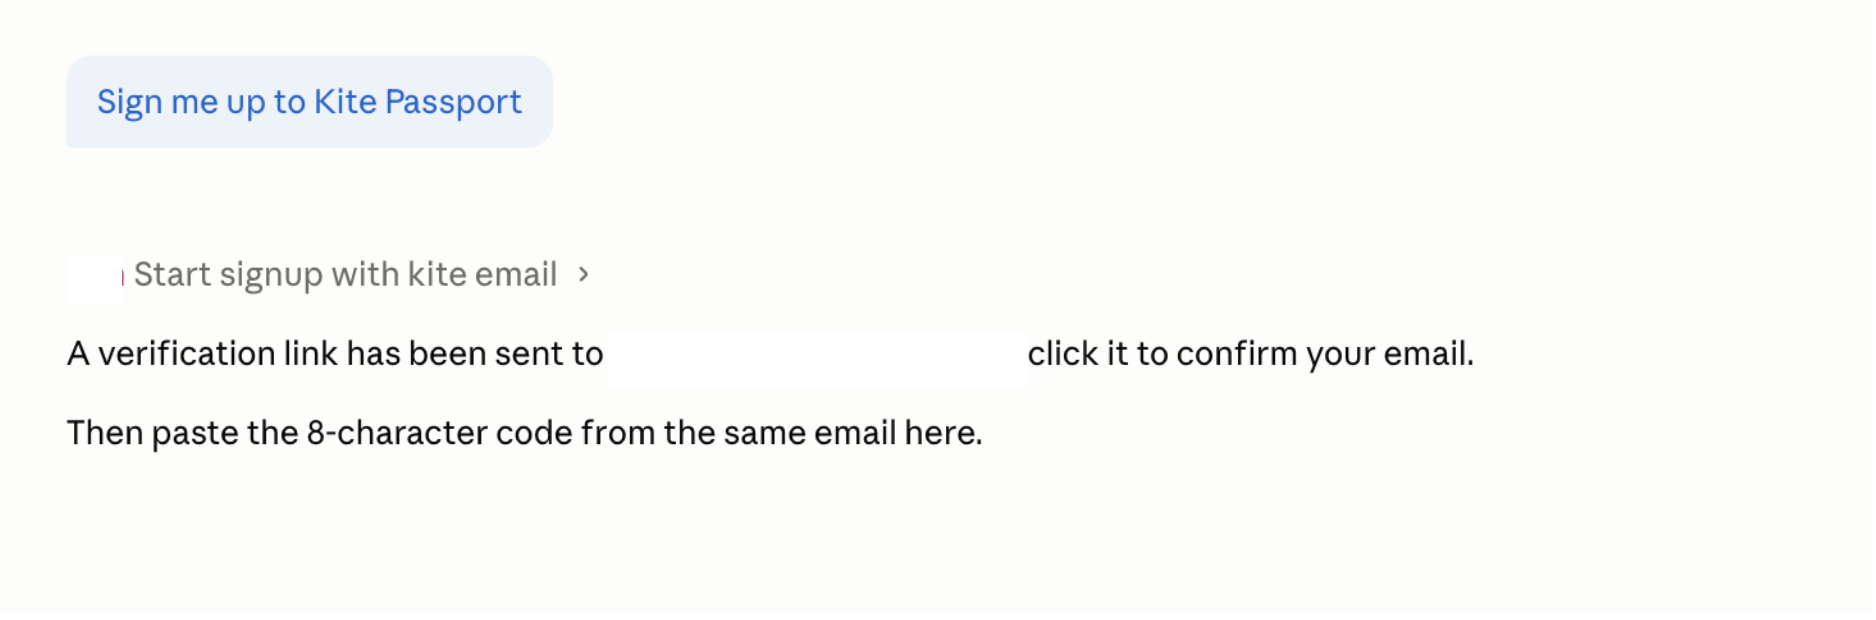
Tell your agent: Sign me up to Kite Passport.

02

Create your passkey

After you click the verification link, create a passkey. This passkey controls Passport approvals. You can return to agentpassport.ai/dashboard to see transactions, guardrails, balance, and Add Funds.

Create passkey screen
Create a passkey to secure approvals
Kite Passport dashboard ready state
Dashboard ready with balance, actions, sessions, and activity

Tell your agent: I clicked the email link and created my passkey.

03

Add funds

Fund from agentpassport.ai/dashboard: use Add Funds for Banxa card, debit, or ACH, or Receive for Kite Bridge crypto funding.

Add Funds modal with Banxa selected
Choose Banxa for card, debit, or ACH funding
Kite Bridge funding screen
Bridge USDC from another chain to your Passport

Banxa handles card, debit, and ACH orders. ID verification (KYC) is required; minimum purchase is $20 USD. Create and complete the order in the browser; after Banxa approval, funds appear as USDC in Passport.

For crypto, copy your Passport wallet address, open Kite Bridge, connect your wallet, choose any source chain/token, set destination to Kite USDC, confirm the receiver address matches your Passport address, then bridge. LayerZero fee is about 0.0065 AVAX (~$0.06), time is about 1 minute; funds can take a few minutes to arrive. Send only on Kite chain ID 2366.

Tell your agent: Show me the Add Funds or Kite Bridge steps for my Passport.

04

Approve a spending session

A session is your agent's guardrail: total budget, per-transaction limit, duration, and where it can spend. Review the approval URL before signing with passkey.

Agent creates a spending session request
Agent creates a two-hour session request
Approve agent session screen
Review limits, then approve with passkey

Tell your agent: Create a general spending session with a $10 budget and $2 per-transaction limit, valid for 2 hours.

Approval creates or confirms your agent identity, creates the spending session, and activates it only after your passkey approval.

05

Start spending

Your agent can now make payments: Amazon purchases, paid API calls, lead finding, website scraping, emails, calls, and other services, all inside your approved limits.

Agent prepares a snack purchase inside budget
Agent stays inside the budget and prepares the purchase

Try these prompts:

Tell your agent: Buy me healthy snacks under $25 on Amazon using Kite Passport.

Tell your agent: Create a 3-day Tokyo itinerary and email it to me using Kite Passport.

Tell your agent: Create a professional LinkedIn Banner using Kite Passport.

Tell your agent: Show me all the services available on Kite Passport.

06

Log back in later

If you return later, do not sign up again. Ask your agent to log you in; you will receive an email code and paste it back into agent chat.

Tell your agent: Log me into Kite Passport.